

Why is every online business owner concerned about website speed?
The answer is simple. Faster websites make more money.
For context, let’s paint a picture with a well known company—Amazon.
If Amazon’s website slows down by 1 second, the company will lose $3.8 billion in annual revenue [*].
79% of online shoppers agree that a business’s website speed impacts their willingness to buy [*]. So, the earlier claim is reinforced: that fast websites make more money.
What if your website is slow? What can you do about it? First, several factors can slow down your website, including excess plugins, themes, third-party integrations, high-res images, etc.
One factor you don’t hear much about is the DNS. Your DNS is the first connection between your website and a user.
Look at it as a user (web visitor) calling from the other end and needing you to open the door so they can enter your website. The longer it takes the user to get in, the longer your DNS lookups will be.
What Is DNS Lookup?
DNS lookup is the process of finding the right IP address for a domain. Before looking up your DNS, you must first understand what it’s about—and why it matters.
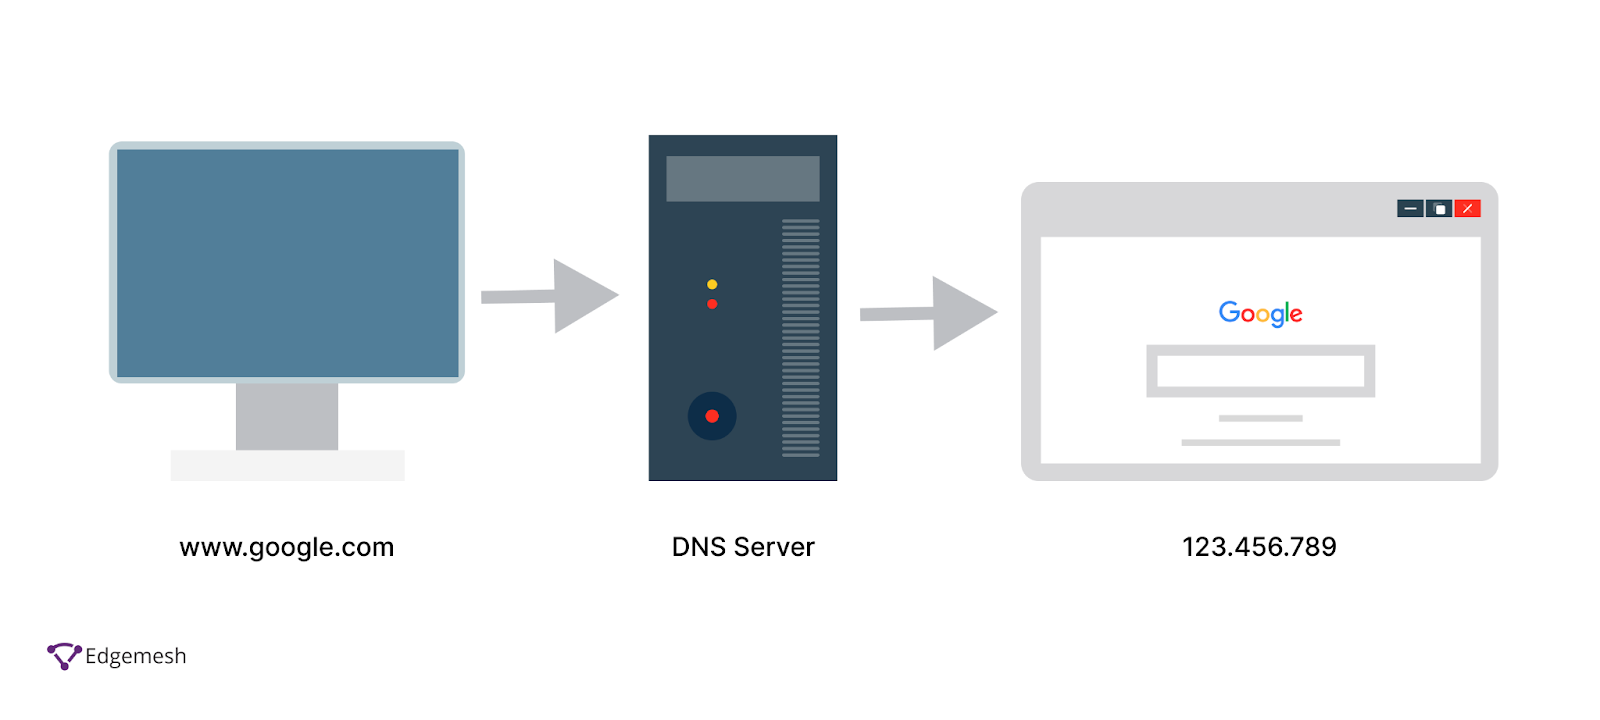
DNS stands for Domain Name Systems—and it’s a system that helps connect websites to their origin IP addresses. For example: yourwebsite.com can have an IP address like 123.456.789.012. But memorizing IP addresses is no fun. So, instead, we use domain names.
Think of DNS as your phonebook. In this case, you’re matching people’s names with their respective phone numbers.
Related → What Is Time To First Byte (TTFB)?
How Does DNS Lookup Work?
Every DNS lookup query is processed through four DNS servers: the DNS recursor, the root server, the TLD nameserver, and the authoritative nameserver.
- First, the DNS recursor receives the initial query from the client and communicates with the other nameservers. E.g., the user types (www.edgemesh.com) in their address bar.
- Next, the root server sends the DNS information of the TLDs (top-level domains) such as .com, .org, and .net.
- Then, the recursor forwards the query to the TLD nameserver.
- Upon receiving the request from the recursor, the TLD nameserver responds with the website’s IP address, and sends the query to the domain’s nameserver.
- Finally, the authoritative nameserver confirms the IP address is also responsible for storing every domain record including: CNAME, A record, AAAA, MX, PTR, NS, etc.
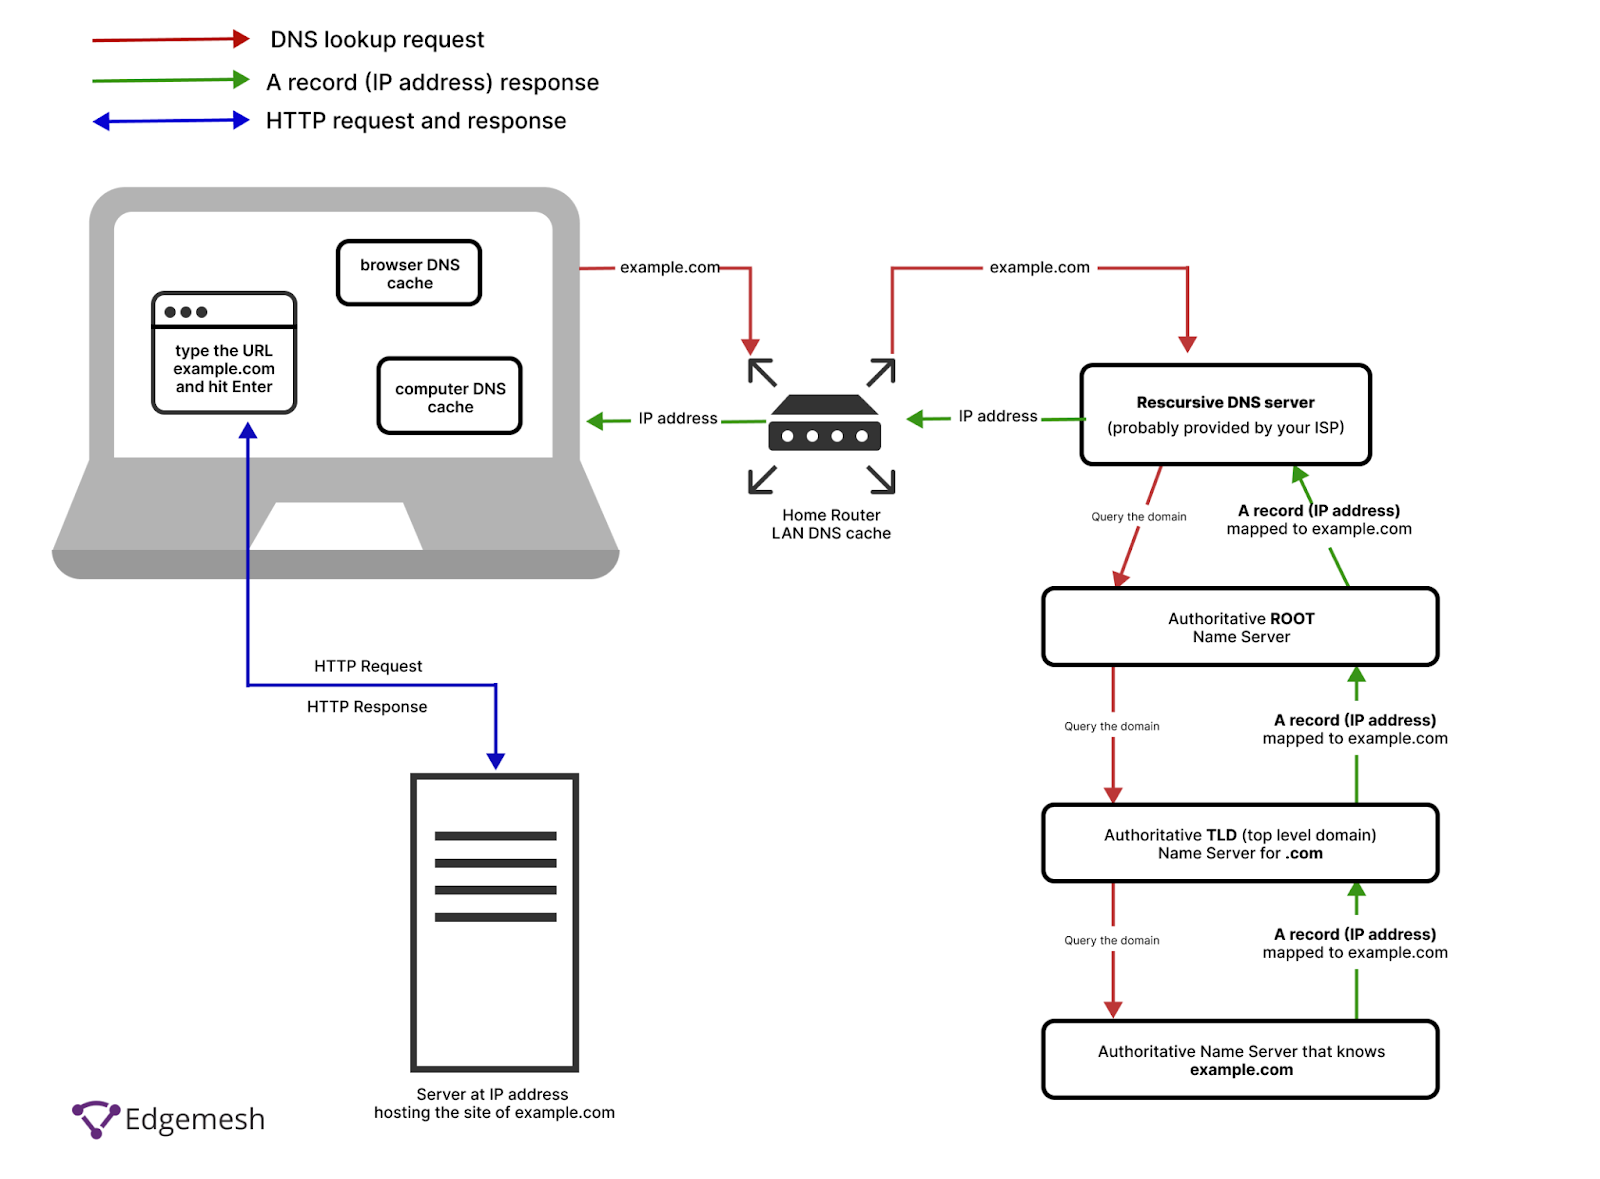
[Source: AWS Solution Architect, Xiaoli Chen]
What Is DNS Lookup Time?
The DNS lookup time is the time taken for the domain name server to process the request of a domain’s IP address and return the target IP address to the browser’s HTTP request.
What Is A Good DNS Lookup Time?
A good DNS lookup time is anywhere between 20 to 120 milliseconds [*].
How To Find Your DNS Lookup Time (Using 3 Tools)
You can find your DNS lookup time using one of the following:
- Pingdom
- GTMetrix
- WebPageTest
How To Find Your DNS Lookup Time Using Pingdom
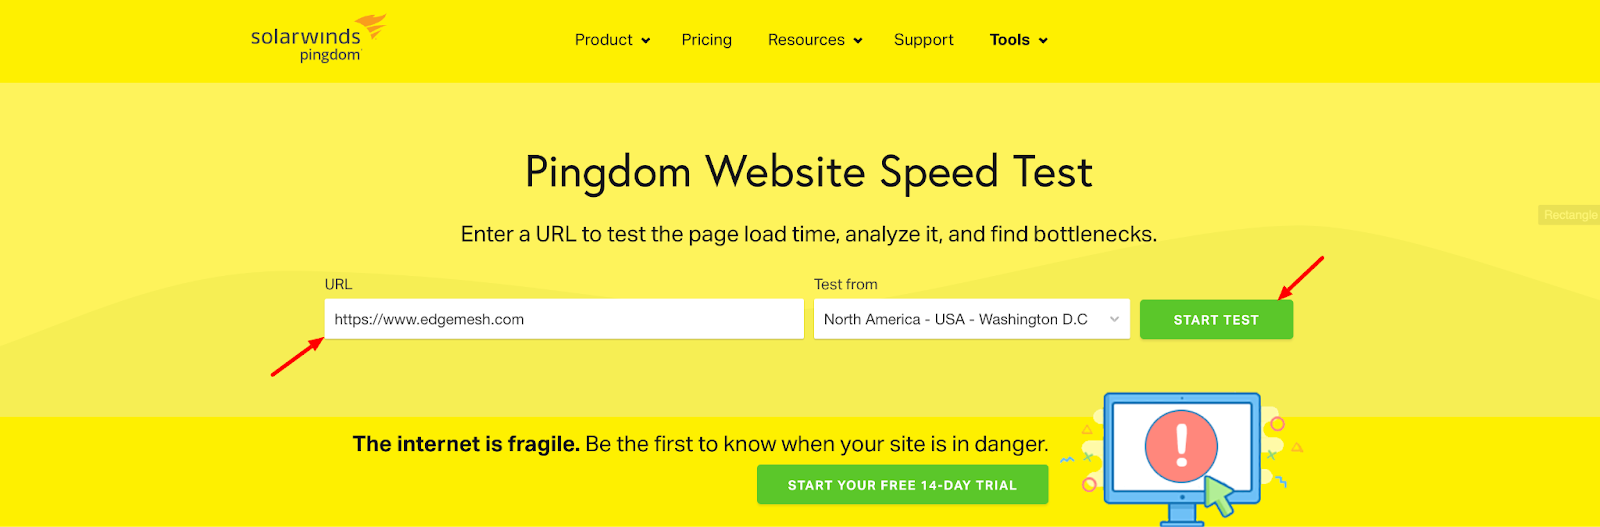
- Visit tools.pingdom.com.
- Input your URL, pick a location to test from, and click on ‘Start Test.’
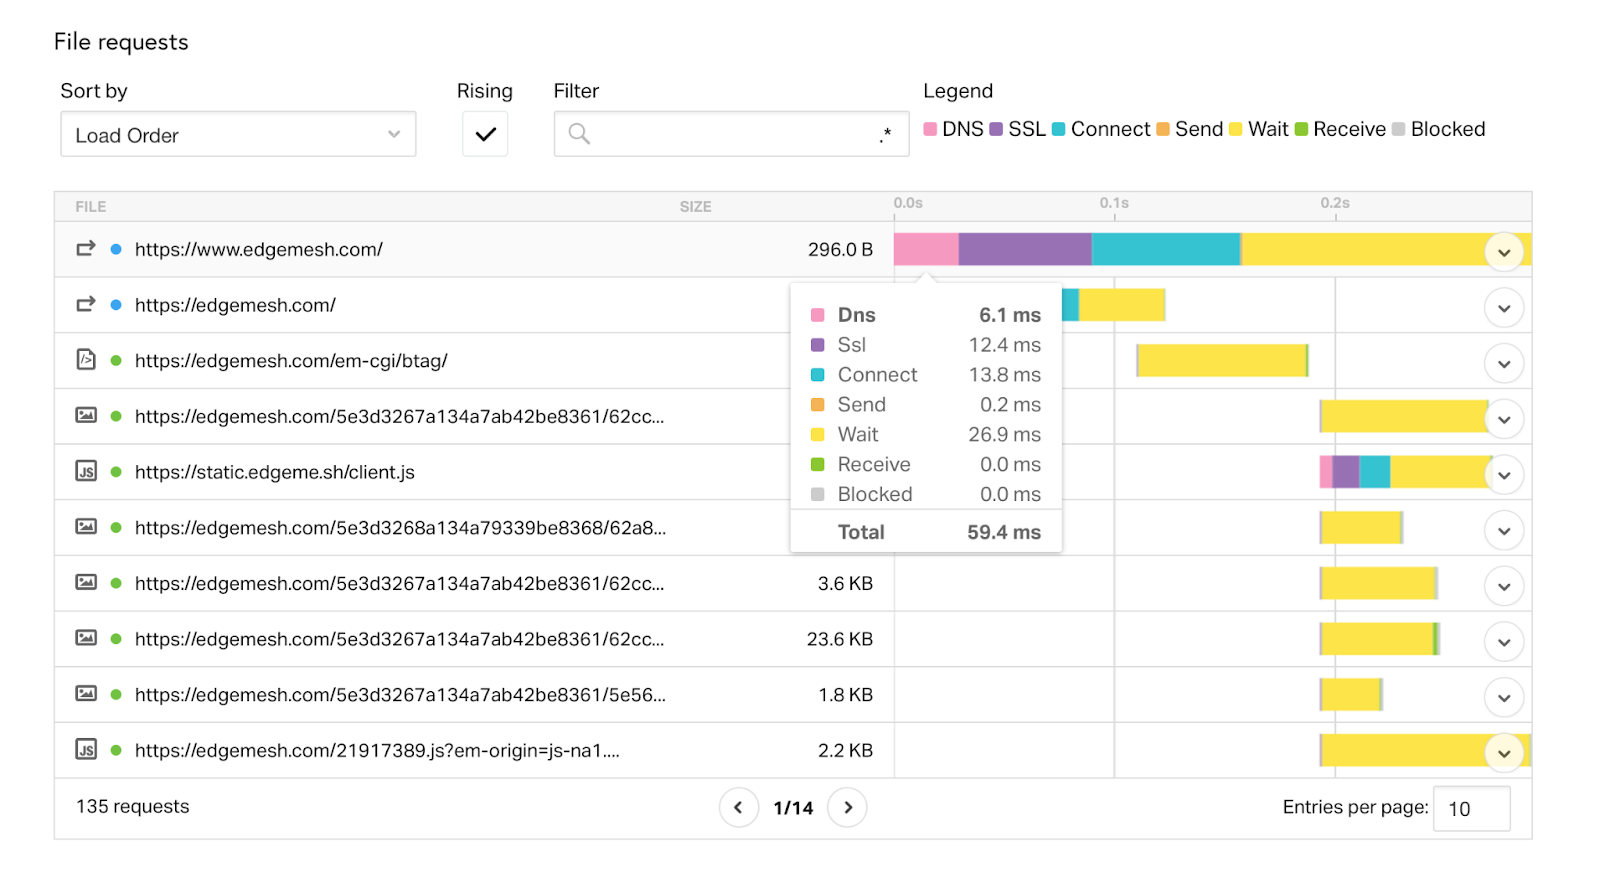
- Once you get your results, scroll down to file requests and sort by load order to discover how each request of your website is being processed.
- In Pingdom’s evaluation, our website (https://www.edgemesh.com) had several requests but only three DNS lookups.

https://www.edgemesh.com
https://edgemesh.com
https://static.edgeme.sh/client.js
- Our main DNS lookup time is 6.1ms, which is good.
💡Note: When you use Pingdom to find your DNS lookup time for the first time, you’ll likely get a high score because it’s running the query for the first time through its servers. This adds to your DNS lookup time.
Hower, Pingdom caches your DNS once— and upon subsequent tests, your DNS lookup time returns to normal as their servers already know your IP address.
Related → What Is Page Speed? [+Why It Matters & 7 Tips]
How To Find Your DNS Lookup Time Using GTMetrix
- Visit GTMetrix
- Input your URL, and click on Analyze.

- Once you get your results, scroll down and click on Waterfall.
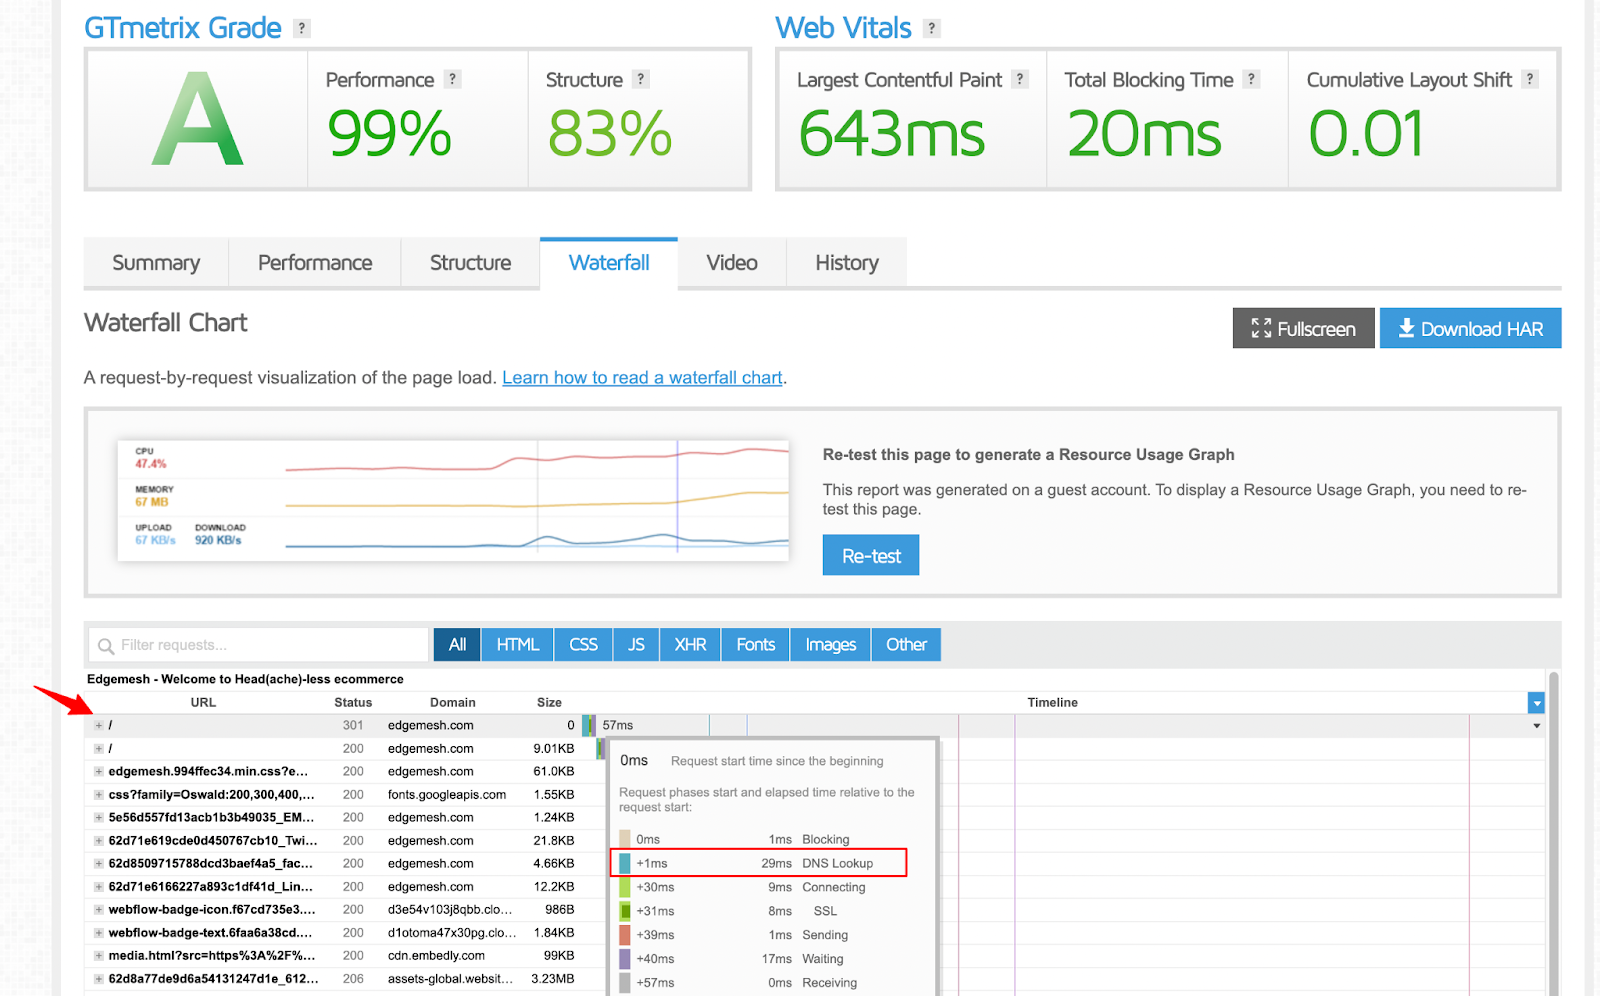
- Based on the result on GTMetrix, our DNS lookup time is 29 ms—pretty good!
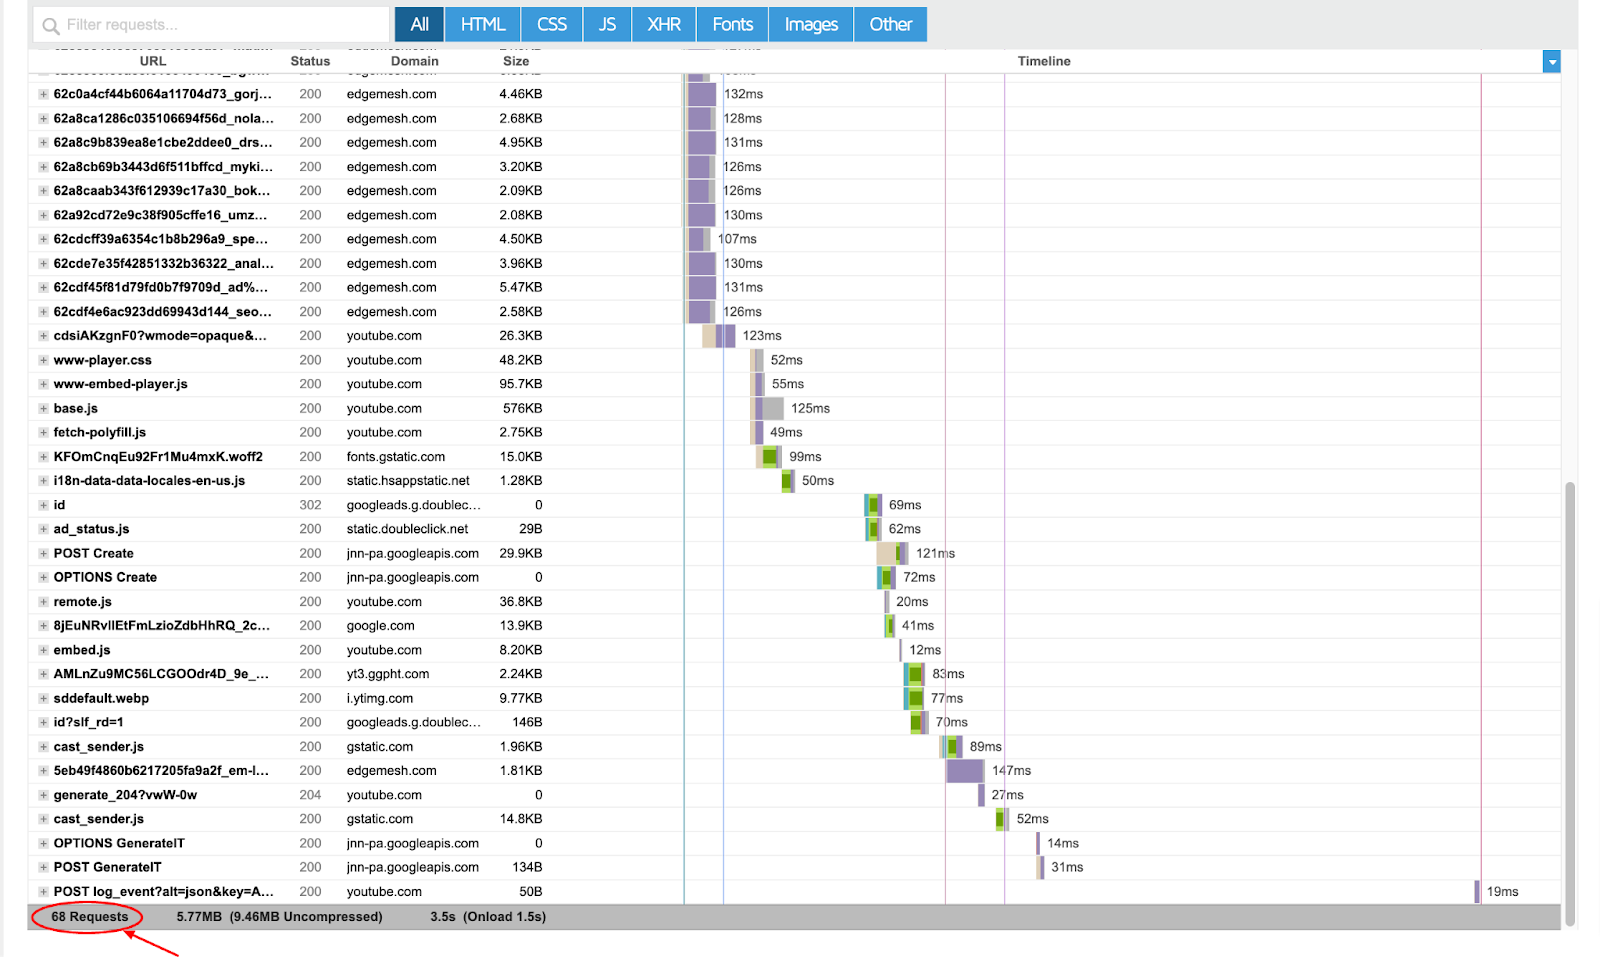
- Also, we had 68 requests on GTMetrix— compared to the 135 requests on Pingdom.
How Do You Find Your DNS Lookup Time Using WebPageTest?
- Visit WebPageTest
- Insert your website’s URL.
- Select your preferred type of configuration:
- Simple configuration. Choose only from the preset device, location and connection to run the test.

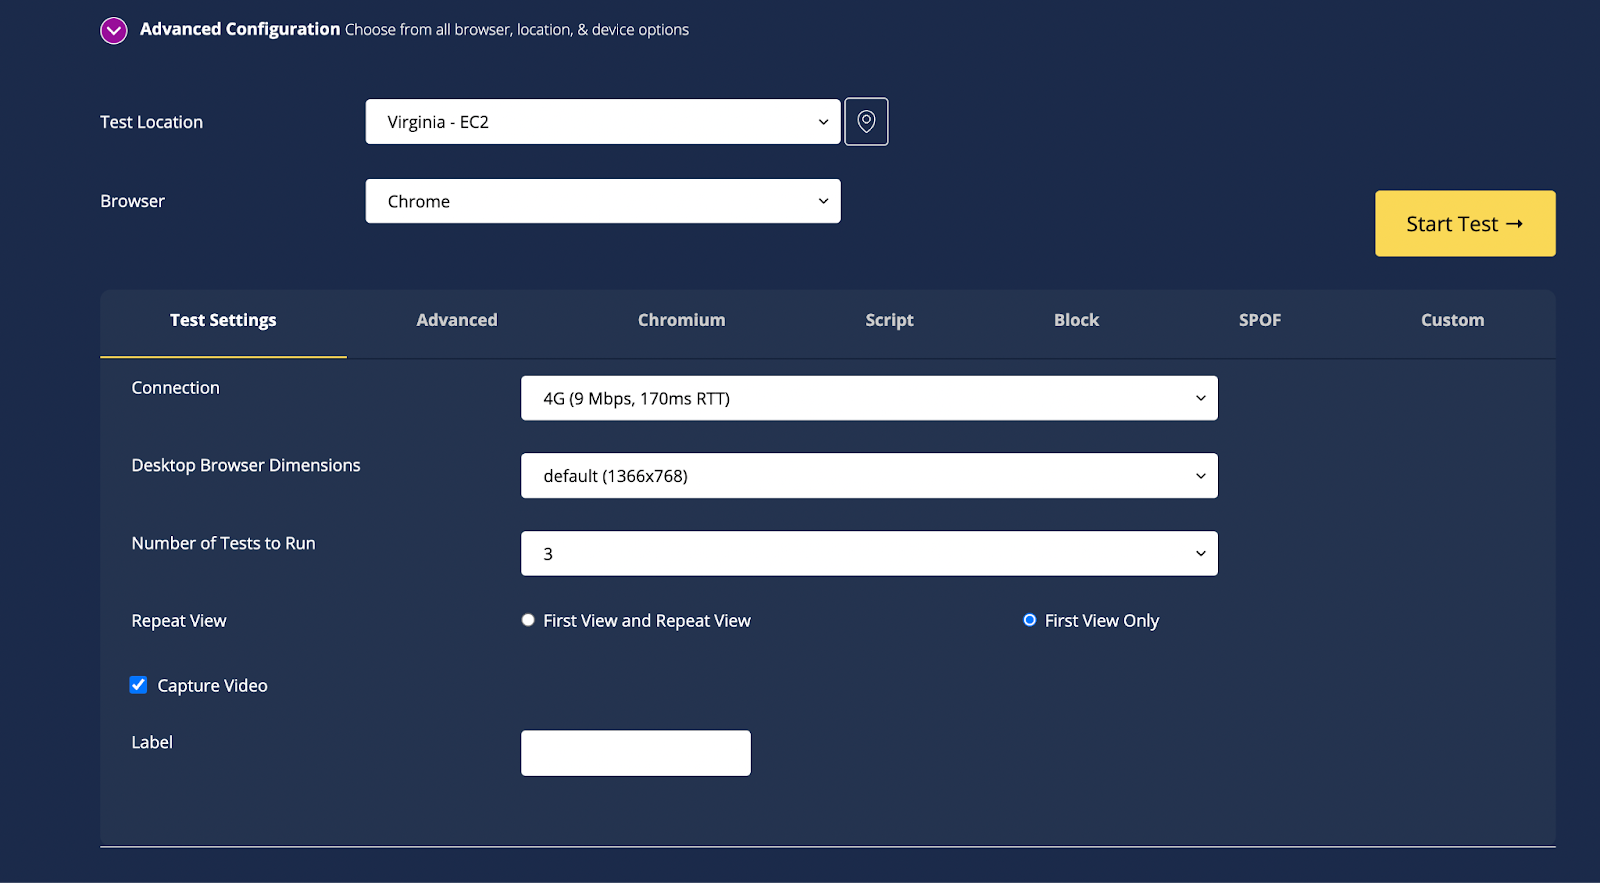
- Advanced configuration. Choose from different types of browsers, location, and connection of your choice to run the test.
For this test, we’ll use the simple configuration option.
- Once set, click on ‘Start Test → and give it 20-30 seconds.

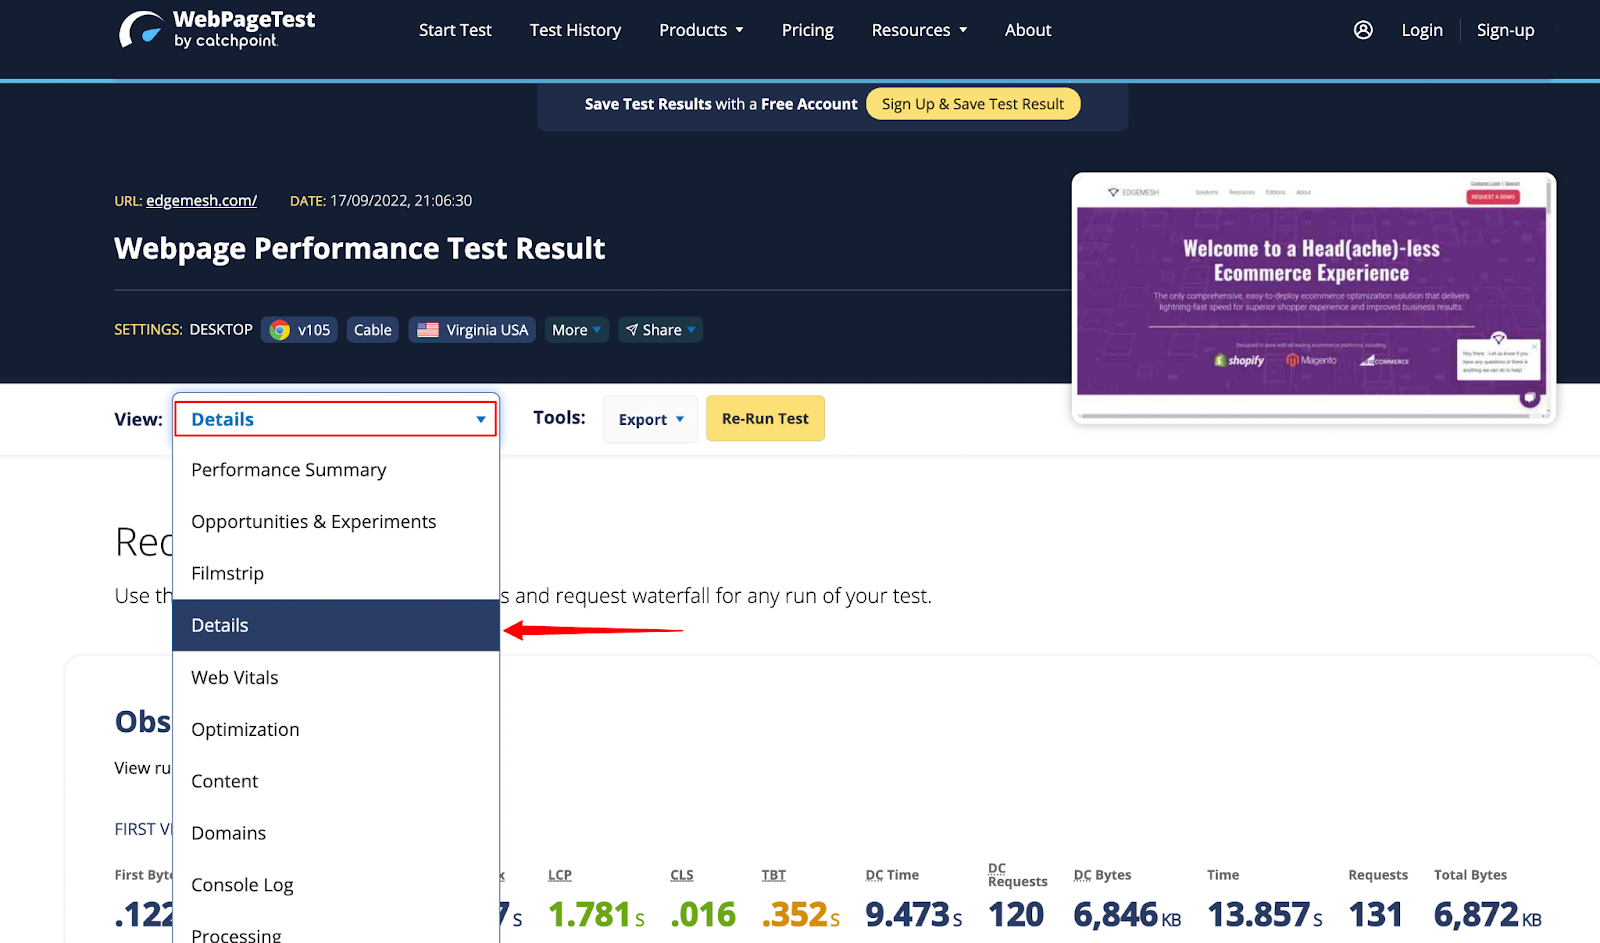
- When you get your results, navigate to View and change it from Performance Summary to Details.
- Then, scroll down to Request Details to see the DNS lookup time of every request made during your website connection.
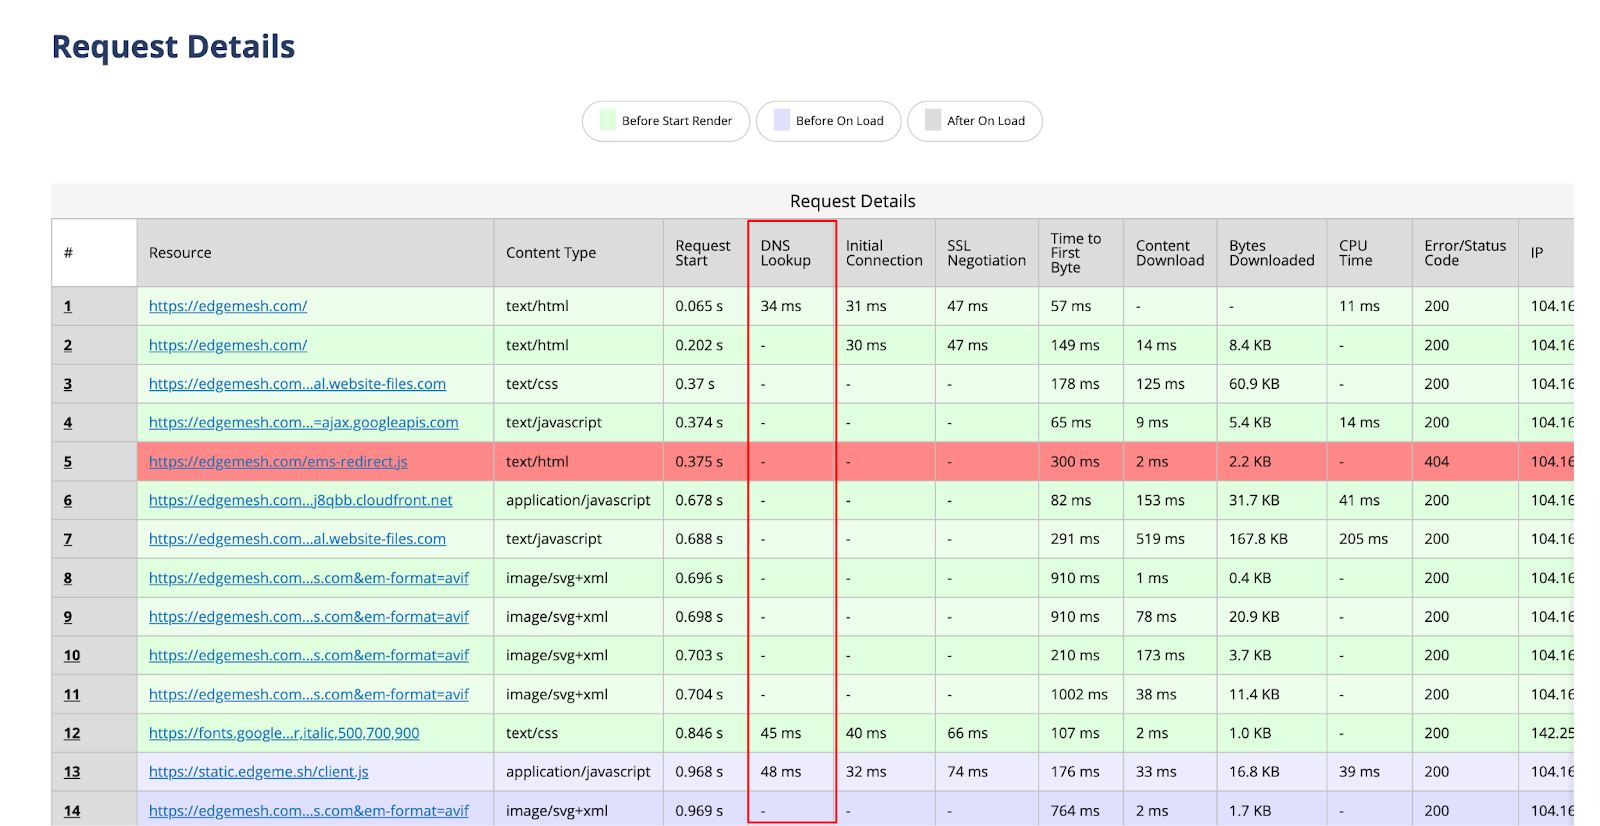
- Alternatively, you can scroll to Request Headers then click ‘+Expand All’ to get a detailed overview of every request.
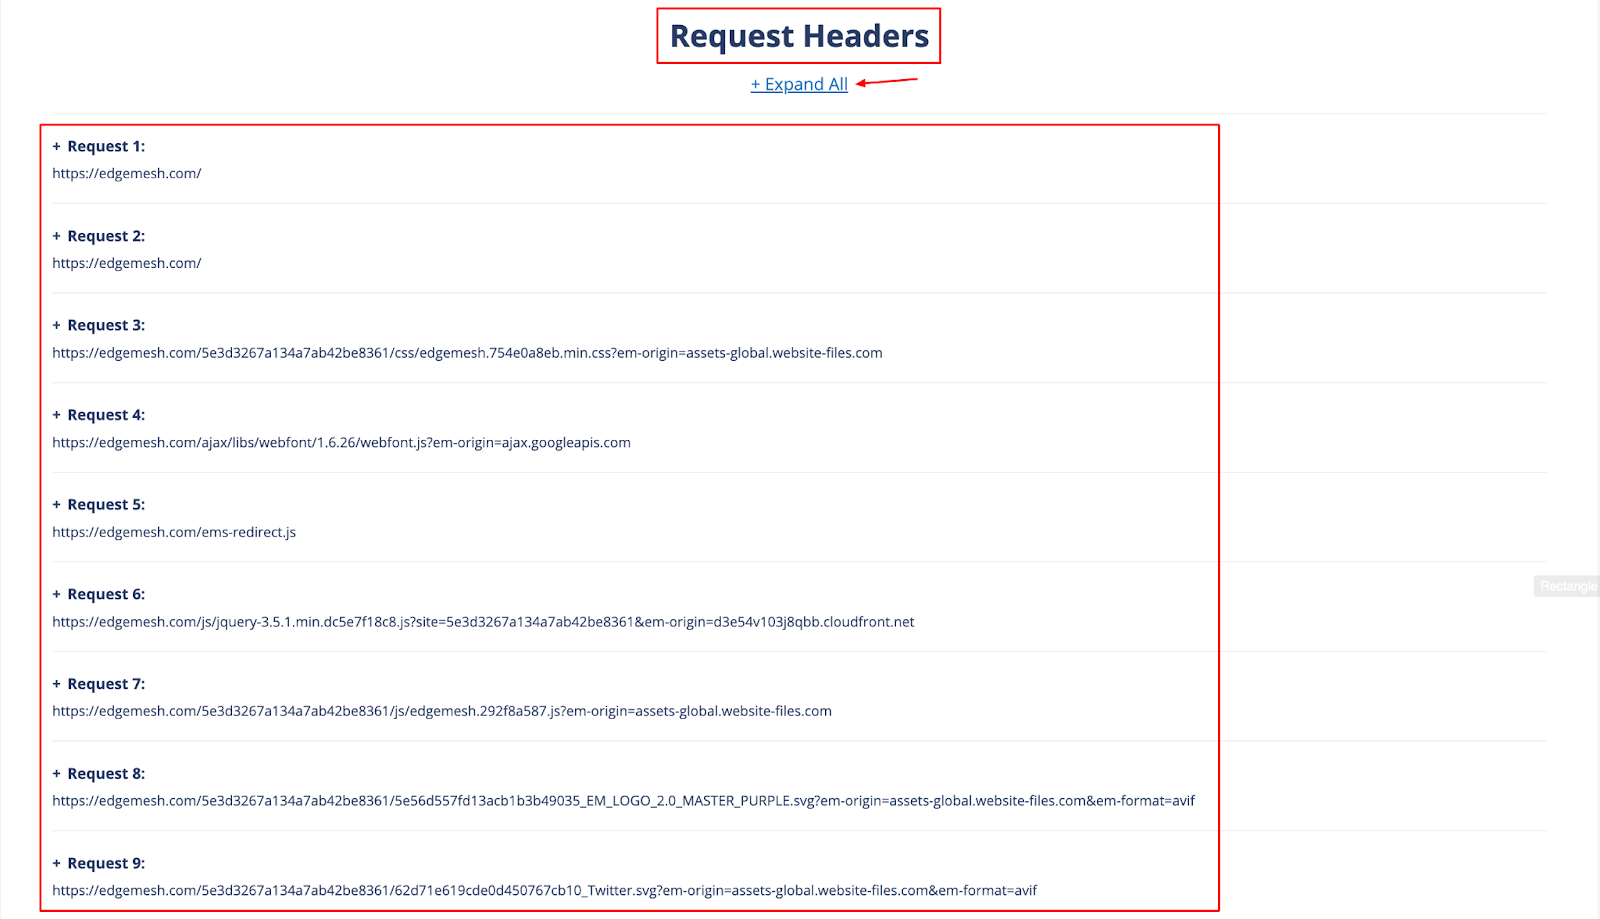
WebPageTest is one of the best tools you can use to find your DNS lookup time as it gives you a complete breakdown of each request.
5 Ways To Reduce Your DNS Lookup Time
1. Use DNS Caching
Every time a user loads or reloads your page, the browser makes another round of HTTP requests (like it’s starting afresh) to the server. These types of subsequent requests affect your page load time—which then influences your DNS lookup time. However, caching your DNS stores your website’s IP address on the browser. This way, the browser can find your hostname without having to make a new DNS lookup request.
While you can’t cache every DNS as this will only worsen the situation, you can choose your length of DNS cache (or TTL, time-to-live).
Below are some recommended baselines:
- CNAME records: 24 hours
- A and AAAA records: 5 minutes to 1 hour
- TXT records: 12 hours
- MX records: 12 hours
When setting your DNS TTL, your host might prefer you set it in seconds, not minutes.
In that scenario, here’s a simple conversion:
- 5 minutes = 300 seconds
- 30 minutes = 1800 seconds
- 1 hour = 3600 seconds
- 12 hours = 43200 seconds
Related → Server-side Caching vs Client-side Caching Explained
2. Set Up DNS Prefetching
DNS prefetching enables browsers to run a DNS lookup in the background while the user is still interacting with the page.
An easy way to configure DNS prefetching is by adding rel= attribute to the HTML link.
Example:
- <link rel=”dns-prefetch” href=”https://www.yourlinkhere.com”>
Also, most commonly used browsers support DNS prefetching—with the exception of Edge, Safari (on iOs), Opera, and Android Browser [*].
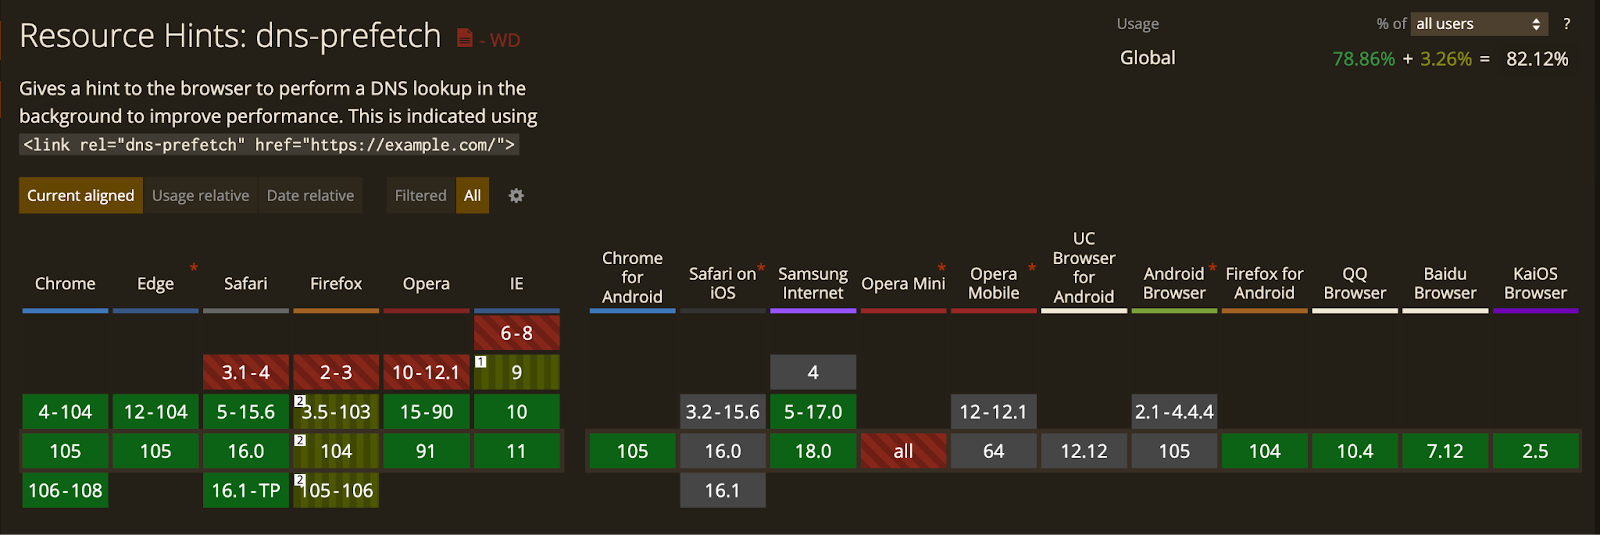
💡Note: DNS prefetching is best used for links within your content.
3. Upgrade To A Faster DNS Provider or Service
When you’re starting a new website, platforms like Namecheap, GoDaddy and the like typically give you a free DNS. However, this DNS isn’t premium, so you don’t get proper optimizations that can improve your lookup time.
Your best option is either to upgrade or switch to a faster DNS provider. Ideally, switching to enterprise DNS providers like Amazon (Route 53), Cloudflare, DYN, and DNSMadeEasy is a better choice. This is because these large providers have an extensive infrastructure with several points-of-presence around the world. All of which aid in reducing DNS latency.
Related → 10 Ways To Speed Your WordPress Website [Guide]
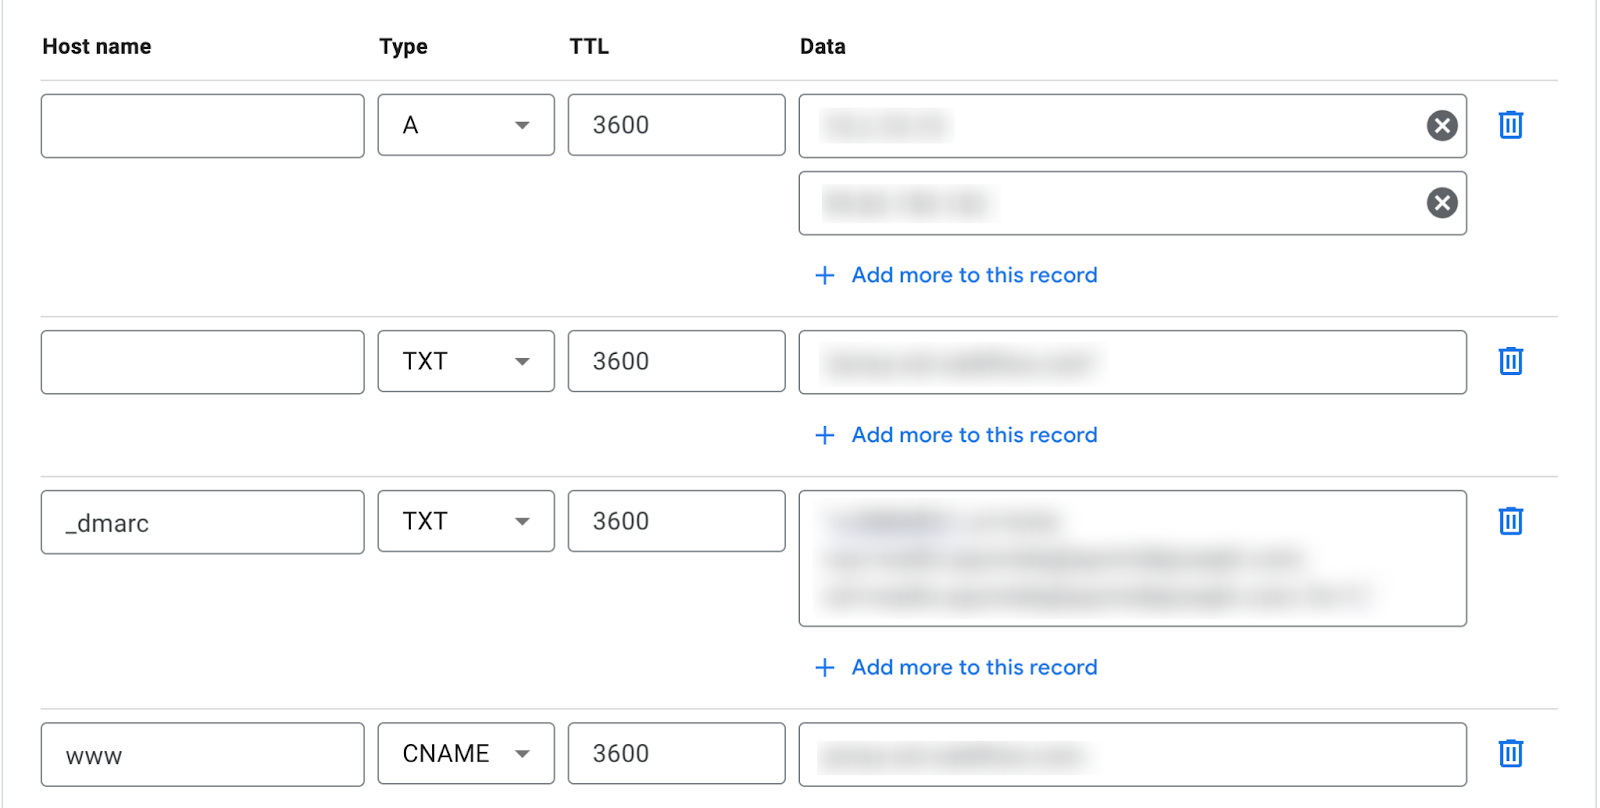
4. Minimize CNAME records and Switch to ANAME
The CNAME record is a type of DNS record that helps connect your subdomains (or alias domains) to your main domain instead of an IP. However, during DNS lookup, excess CNAME records increase the time it takes the browser to connect to the main IP of your domain.
If your CNAME is configured like the following example:
- www.yourwebsite.com. 1543 IN CNAME yourwebsite.com
The CNAME resolves the “www” into the hostname and then resolves into the IP address, like this:
- yourwebsite.com. 1543 IN A 123.456.789
In this case, using the ANAME record at the root level is a better option as it resolves directly into the IP address.
- www.yourwebsite.com. 1543 IN A 123.456.789
5. Defer Loading Javascript
Deferring javascript doesn’t entirely impact DNS, but rather page load time. This approach allows your website to load all plain HTML content, while preventing Javascript from loading immediately until it's needed.
💡Pro tip: If you use WordPress, Async Javascript by Frank Goossens is a great plugin to help you do the heavy lifting.
Related → What Is Dynamic Rendering [+How It Impacts SEO]
Bonus: Move Third-Party Resources To A CDN
Loading third-party resources involves sending requests from your server to an external server. While the response time between both servers might feel fast, high latency can often be a major issue on most occasions. Especially when you’re loading assets like fonts or videos.
In this case, moving external resources to a CDN is the best way to limit the number of requests going from your server to an external server
💡Pro tip: Using Edgemesh’s Smart Client + Cloudflare’s CDN offers a new edge-computing platform that can help you deliver your content faster.
Let’s Wrap It Up
Reducing your DNS lookup time is only a small part of improving your website speed. You also want to target other core areas like your first input delay, time to first byte, and other core web vitals.
There are several plugins and services that claim to help improve your website. Avoid installing or integrating too many on your website— they could end up causing more harm than good.
Take all the tips we’ve shared and use them to improve your website.
Remember, fast websites make more money.
💡Want to see how Edgemesh can help you reduce your DNS lookups? → Get a demo


